Sourdough Boule
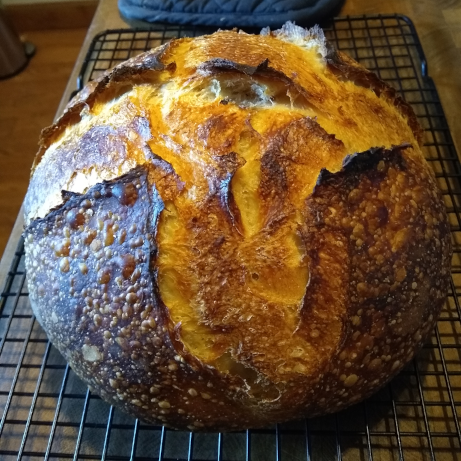
This is my weekly bread loaf that has evolved since mid-2018. Since I make it so regularly, its creation and general culture upkeep are intertwined. On an average week, it produces something like this:

I keep the culture at 100% hydration (i.e., equal mixture of flour and water by weight) solely because it simplifies the arithmetic of feeding. For similar reasons, I typically double the total size every feeding. Flour for most feedings is equal parts white and whole wheat, as it is more difficult for me to determine culture health when fed entirely whole wheat.
So, to start with, I remove ~110g of unfed culture from its home in the refrigerator. The remainder is fed, and placed back in the refrigerator. (If there is less than 100g remaining after feeding, it is instead kept warm and re-fed at 8-12 hour intervals until there is enough again.).
The 110g of culture is doubled: add 55g of water and 55g roughly equal parts white and whole wheat flour for a total of ~220g of goo (after mixing). At this point I cover it and go to work, so it won’t be touched for 10-12 hours.
Then, to the bubbly goo, I add 16g of salt, ~380g water, ~600g flour, and (depending on how things are feeling) 7g carraway seeds. I will regularly go up to 300g of the flour being whole wheat here: the more whole wheat used, the sooner the bread seems to become crumbly. It also affects how easy the dough is to work with, but not anywhere near as much as rye (which probably deserves its own post that it may or may not receive).
I mix that with a spoon until there are no dry flour clumps. Then, three times the dough sits for an hour and is folded. To fold, I first gather the dough in the bowl and flip it over, keeping it in the bowl. Then I grab an edge, stretch it as far as it will go without tearing, fold it back over the dough, and rotate 90°. I repeat the folding until it is no longer possible (except on the first attempt, where I usually get bored after 12 or so folds). Once done folding, I flip the dough ball back over, cover, and go back to waiting.
Once the three wait-and-fold cycles are done, the covered ball goes into the refrigerator for 24-48 hours and I go to bed.
When it is time to begin the baking process, first the ball is removed onto the counter for about 15 minutes in order to warm up. Typically I try to remove the larger air pockets here, but most shaping happens after it is warm. While waiting I dust the bottom of the dutch oven with cornmeal.
To shape, from the bottom, I push the edges of the ball inside itself. The goal is a taut but unbroken exterior surface, but it tastes just as good even if it rips. The ball goes seam side down into the dutch oven, which I cover and then let sit 2.5-3 hours.
After that, I set the oven to preheat at 475°F. While it does that, I lightly score the top of the ball (an X, unless creativity strikes) about 5mm deep. Scoring the is the step I am most likely to forget - the result is by no means ruined, but I find the texture less appealing.
Once preheated, I insert the covered dutch oven, and immediately drop the oven temperature setting to 425°F. It bakes like this for 45 minutes. Then I remove the cover and bake 10-15 minutes until it reaches the target color.
Then the bread is removed (hopefully easily) from the dutch oven onto a wire rack to cool “completely” (i.e., until I get bored of waiting and slice it). I have seen others recommend placing the loaf back on the oven rack itself to crisp, but I cannot recommend doing so here as that resulted in cornmeal on the bottom of the oven, which burned.
My personal preference is for day-old bread, so ideally I cover the cooled loaf with a towel and let it sit overnight before slicing. I have also determined that roommates are much more likely to eat bread that has been sliced rather than that which they need to slice for themselves. Letting it sit also makes it easier to create thinner slices - I target about 1cm.
Enjoy!